3D Scanning and Photogrammetry for Mapping: The Full Method
3D scanning and photogrammetry produce the same thing: a digital record of a place, accurate and to scale, that you can open on your laptop months after you left the site. Photogrammetry rebuilds that record from photos. A laser scanner measures it with a beam. Both end up as a point cloud, then as a usable 3D model. This guide covers one specific angle: 3D scanning and photogrammetry applied to video mapping and projection, not surveying, not construction, not 3D printing. Most resources online talk about topography or heritage documentation. Here the end goal is not a measurement, it is an image that lands exactly on a wall.
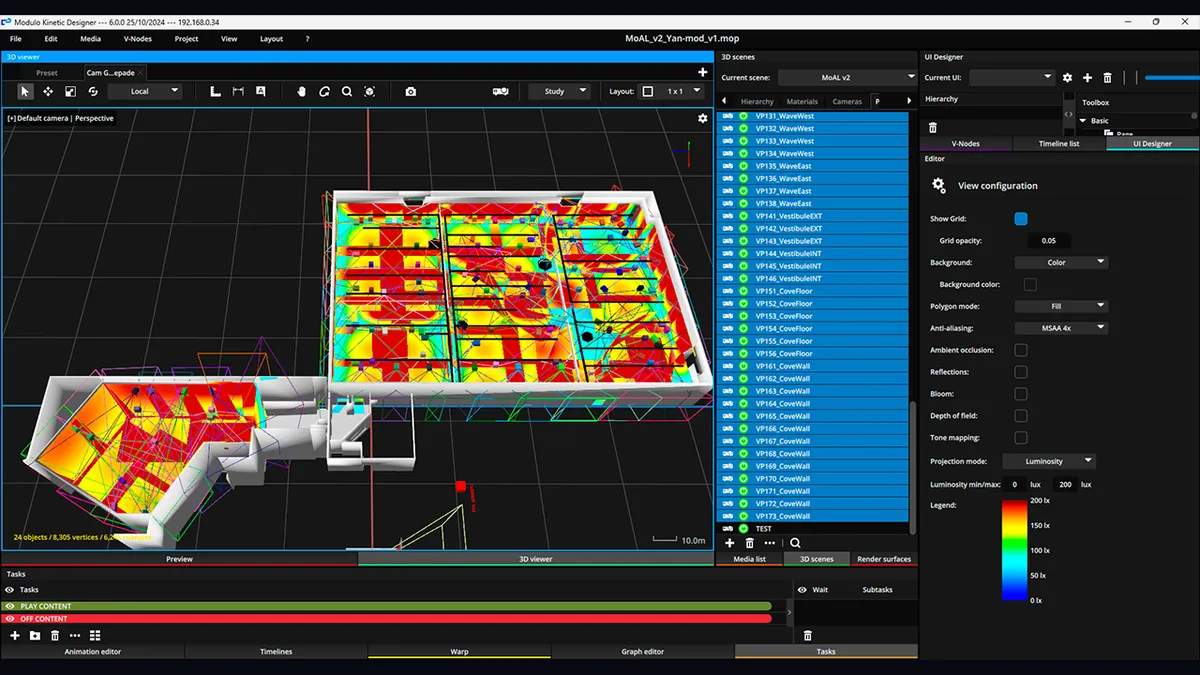
I have been preparing mapping projects for 15 years. The Museum of Art and Light in Kansas covers 3,400 m² with 108 projectors and 28 Modulo servers; the Arc de Triomphe in 2020 ran 15 Barco projectors on Modulo Player Pro; the Culturespaces network, seven permanent projection sites. On none of them did anyone measure a wall with a tape. A bad scan costs you an extra week of on-site calibration. A good scan settles 80 % of the project from the office. The difference is in the method, not in the price of the scanner.
This pillar follows the whole chain, in the order I actually work it: choose the capture technology, choose the software, capture on site, clean the point cloud, retopologize, texture, and import into the media server. Each step has its own deep-dive guide; this page ties them together.
The first question everyone asks is "photogrammetry or laser scanning". The honest answer depends on what you are projecting onto.
A laser scanner (Leica, Faro, Trimble) sends a beam and measures the return time. It gives millimetre-accurate geometry, immune to light, usable in the dark. That is the default for a museum interior, a room, an architectural volume where the dimensions have to be right.
Photogrammetry rebuilds the volume from overlapping photos: software correlates common points across the images and infers depth, the way human vision does. It shines on colour and texture, costs a fraction of a laser scanner (a DSLR or a drone is enough), but it is sensitive to lighting and to featureless surfaces. On an outdoor facade shot from a drone, it is often the best trade-off.
For mapping, the criterion is not "which is more accurate in the abstract". It is: how big is the projected pixel on the surface, and how close does the audience stand. A facade mapping seen from across a square tolerates a centimetre-level survey. An object mapping you approach within a metre demands sub-millimetre. The full breakdown, terrestrial laser versus drone versus structured light, lives in choosing a 3D scanner for mapping.
If you go with photogrammetry, the software is half the result. Three families dominate the field applied to live events.
RealityScan, the former RealityCapture now owned by Epic Games, reconstructs detailed meshes fast from photos and laser scans mixed together, and it is free below a revenue threshold. Agisoft Metashape is the workhorse of surveyors and heritage teams, highly controllable. Meshroom (open source, AliceVision engine) gets you there with no budget but wants a strong GPU and patience.
The real question is not "which is best", it is "which one produces a mesh your media server can digest". Software that outputs eight million gorgeous triangles is useless if Modulo Kinetic chokes on it. The detailed comparison, with export formats and licensing traps, is in photogrammetry software for mapping.
On site, scanning works in stations. Each station is a 360° capture from a fixed point: the scanner spins on itself and records everything around it in one to three minutes. You move the machine, repeat. The rule that never changes: every point in the space must be seen from at least two stations, or it will be missing from the cloud.
The station count follows complexity, not floor area:
Three field habits that decide how clean the survey is. Clear the space: anything left in frame ends up in the cloud, cables, carts, people. Ban walk-throughs while a station is running, or you collect "ghosts". Deal with reflective surfaces (glass, mirrors, polished steel) that scatter the beam; in photogrammetry the trap is the opposite, featureless surfaces like a smooth white wall give the software no common points to correlate. Outdoors, you often scan early in the morning, when the site is empty and the light is stable.
A word on density: scanners offer settings from 5 to 300 million points per station. For mapping, medium density is plenty, because the final model will be simplified for real-time anyway. Scanning an object at very high density when you are about to decimate it wastes time on site and bloats every step after. The full method, from recon to registration, is in 3D scanning a building to project onto it.
What the scan produces first is not a model, it is a point cloud: millions of points, each with an XYZ position and often an RGB colour. Modern scanners pre-align it on site, but the fine registration and the cleanup happen at the desk, station by station. Budget 15 to 30 minutes of cleanup per station to strip noise, outliers and ghosts.
The raw cloud is the richest and heaviest format: several gigabytes for a mid-size project, in E57, LAS or PLY. It serves archiving, precise measurement and import into CAD. But it is not projectable as is. A media server does not map points, it maps a surface. The cloud is raw material, not a deliverable. The difference between a point cloud and a mesh, and how to work the former without drowning in gigabytes, is the subject of the 3D point cloud guide.
This is the step everyone underestimates, and the one that separates a decorative scan from a usable one.
The raw mesh out of a scan is a "dirty" mesh: triangles in the millions, chaotic topology, holes, noisy surfaces. It is faithful and unusable in real time. Retopology rebuilds a clean, light surface on top of it, with regular geometry: you go from several million triangles to a few tens of thousands, fill the holes, smooth the noise.
For mapping the target is simple: 10,000 to 100,000 triangles depending on complexity, a topology that follows the real edges of the architecture (wall corners, cornices, openings), because those edges are what calibration will have to line up with reality. A 500,000-triangle mesh does not improve the projection, it makes the media server crawl. The tools (Quad Remesher, ZBrush, Blender's retopo modules) and the method are in retopology: from raw scan to clean mesh.
Once the surface is clean, it needs to be dressed. Two distinct needs, not to be confused.
The colour texture from the scan (the coloured cloud, or the photogrammetry photos) is a visual reference: it tells you what the place looks like, where the joints, the patina, the flaws are. Precious for laying out content, not for projecting it.
The UV layout is what matters for mapping: it is the flat map that says how the video content wraps onto the 3D model. A clean UV, no stretching, aligned on the logical faces of the architecture, is what lets a motion designer work on a readable 2D texture instead of a warped patchwork. If the UV is bad, content twists, and nobody understands why the logo smears across the wall corner. On scan-derived models, manually unwrapping the zones that will carry key content beats a global automatic unwrap.
The clean, textured, unwrapped mesh exports as OBJ, FBX or glTF/GLB, and that is where the chain meets the projection world.
In the media server (Modulo Kinetic, Disguise, Pixera), import goes in this order: load the model, check the scale (1 unit = 1 metre, the most common and most expensive mistake), place the virtual projectors at their planned positions, simulate the projection, and the model becomes the reference you will calibrate the real machines against. That is what lets you validate overlaps, shadow zones and projector count before a single flight case leaves the warehouse. The full pipeline, formats, scale, normal orientation, is in from scan to media server.
Before the media server even, the scan-derived model imports into Lumeo to place projectors in a 3D scene, check real lux on the surface, and share the study by link, with nothing to install. It is the "does this hold up" step before you rent the gear.
And once the hardware is on site, the scan stops being a model and becomes a template: it is what you align the real projectors against. The scan precedes calibration, it does not replace it. The whole field phase, placement, warping, edge blending, colour, is covered by the projector calibration guide.
A point most quotes miss: the same point cloud serves well beyond projection, and that changes its cost-benefit. Once the survey exists, it feeds the whole technical fit-out of the site. Speaker placement and sound coverage simulation. Lighting positions and their angles. Rigging points, trusses, cabling. Every trade works off the same geometric truth instead of measuring separately and contradicting each other on build day.
On heritage projects, the scan also becomes an as-built record: it documents the building as it really is, deviations from the original drawings included, at an accuracy no hand survey reaches. Scenographers use it to test configurations virtually and to present the project to a board or a city before any build starts. And you can pull 2D plans and sections from it at any point, sometimes the main deliverable for an engineering office. In short, a scan paid for by the mapping often pays for itself a second time elsewhere.
A 3D scan is priced by the size of the space and the complexity of the post-processing, not by the number of photos. A single 200 m² room scans in one to two hours, five to ten stations. A 1,000 m² museum takes a day. An outdoor monument, one to two days. Then add 1 to 3 days of post-processing, registration, cleanup, retopology, export, depending on the finish required. Post-processing often costs more than the time on site, and that is normal: that is where the scan becomes usable.
Should you buy a scanner? No, unless you scan at least a dozen projects a year. A terrestrial laser scanner plus its software suite is a heavy budget, and post-processing expertise is not improvised. For a one-off, a specialist delivers a better cloud, faster, for less than the depreciation on your own machine. Photogrammetry is different: with a good DSLR or a drone and free software, a studio can produce its own facade surveys without investing in laser. That is often where you start.
Cases where I told a client not to scan:
A scan pays for itself the moment it saves a night of recalibration. But a badly prepared scan costs the price of the scan and the night of recalibration. Preparation is not optional.
In order: choose the technology by surface and viewing distance, choose software that outputs a digestible mesh, capture cleanly in stations, register and clean the cloud, retopologize to a real-time mesh, unwrap the UVs, export, import into the media server at the right scale, simulate, then go on site and calibrate the real machines against the model.
The first five steps are desk work that costs little. Every mistake that survives them is multiplied by the number of projectors on build day. On the MoAL, the 3D architecture was validated from France before install; the weeks on site went into fine calibration, not into discovering what should have been measured.
If you are still torn between photogrammetry and laser, or unsure what density to aim for, start with choosing a 3D scanner. And if the doubt survives the read, write to me: I have already made most of the mistakes you are about to make.
Cookies and privacy Learn more
This site uses cookies to measure audience and improve your experience. You can accept, reject or customize your preferences at any time. Learn more