
Projector calibration: the method I use on real installs
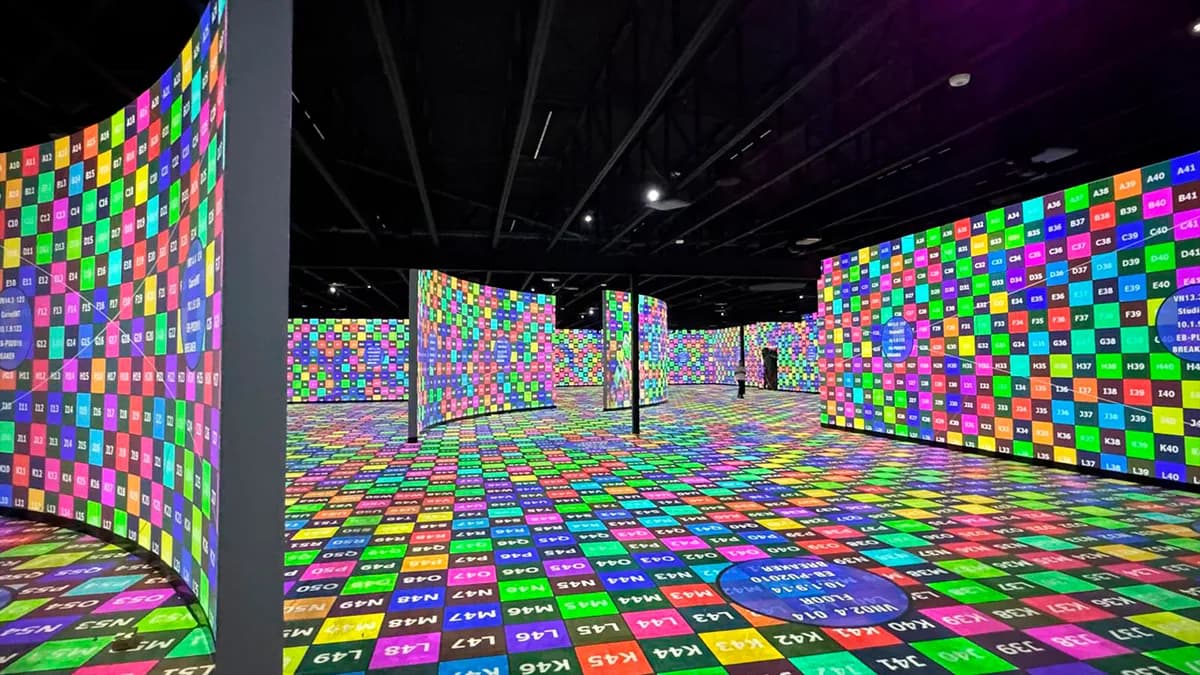
Calibration test patterns projected across multiple projectors at the Museum of Art and Light

If you typed "projector calibration" hoping to fix the colors on your living room projector, this is not the right page. Plenty of home cinema guides cover picture modes and sharpness sliders. This guide covers professional projector calibration: video mapping, multi-projector installs, museums, monuments, permanent venues. The installs where a sloppy calibration costs a night of overtime and, occasionally, a client.

I've calibrated the Arc de Triomphe seven times and ran the technical study for the Museum of Art and Light in Kansas: 104 Epson projectors and 28 Modulo media servers on 3,400 m². The method below is what I actually do on site, written down once so I stop repeating it in briefings. Short version: calibration is an order of operations, not a menu of settings. Do the steps in the wrong order and you'll spend your nights compensating in software for mistakes made with a tape measure.

Why the order matters more than the tools

Nine times out of ten, when I take over a struggling install, the real problem was created before anyone opened a projector menu. A projector 40 cm off its planned position. An optic picked from the wrong chart. A media server outputting a scaled resolution nobody noticed.

Software will hide some of it. It hides nothing for free. Every pixel you warp is a pixel you stretch, and every correction you stack eats contrast, sharpness or brightness. So the sequence goes from physical to digital:

  1. Physical placement of the projectors
  2. Optics: lens choice, shift, zoom, focus
  3. Media server and signal chain
  4. Alignment and warping (geometric correction)
  5. Edge blending
  6. Color calibration
  7. Real operating conditions: ambient light, drift, maintenance

A mistake at step 1 costs ten times more to fix at step 4. That ratio is the whole guide. Everything else is detail.

Step 1. Physical placement: calibration starts with a tape measure

Before anything is powered on, the projector position decides most of your image quality. Three things to lock down:

  • Throw distance and throw ratio. For indoor mapping I usually work between 0.8 and 1.5, outdoor large format between 1.5 and 2.5. Run the numbers before the truck leaves the warehouse: my free throw ratio calculator does exactly that. I once reviewed a plan with a 0.7 throw ratio on a 12-meter wall. On paper it worked. In the room, the projector landed inside the bar.
  • Pixel size on the surface. Lumens on the spec sheet mean nothing until you know how many square meters each projector covers. For multi-projector layouts, the multi-projector calculator gives you projector count, overlap and pixel density from the surface dimensions.
  • Perpendicularity and mounting. Every degree of off-axis placement becomes warping later. Sometimes off-axis is unavoidable (a pillar, a doorway, the fire exit that was on no plan). Fine. But make it a decision, not an accident.

For anything beyond a flat wall, I simulate the placement in 3D before committing to hardware. That's the reason I built Lumeo, a previz tool for AV installs: 293 projectors and 763 optics in the database, real lux computed on the surface, running in a browser. Fifteen minutes of simulation regularly kills a week of on-site improvisation.

Step 2. Optics: shift first, keystone never

Once the projector sits where the plan says, the optical settings come before any digital correction:

  • Lens shift moves the image optically, without quality loss. Use all of it before touching anything digital.
  • Zoom sets image size, and on most optics the extremes of the zoom range cost you brightness and edge sharpness. Mid-range when you can.
  • Focus at operating temperature. A lamp-based projector drifts as it warms up. Focus after 15 minutes of runtime, on a fine grid pattern, checked at the center and all four corners.
  • Keystone correction is an apology delivered in pixels. It resamples your image and murders fine detail. On a pro install, if you're reaching for keystone, the answer is almost always: move the projector.

(For the purists: yes, some high-end optics hold focus across the whole shift range. Most don't. Check yours before trusting it.)

Step 3. Media server and signal chain: one pixel in, one pixel out

The most common invisible mistake in projector calibration has nothing to do with the projector. It's a signal chain silently scaling the image. Before geometry work starts, verify:

  • Native resolution end to end. Server output, matrix, extender, projector input: each link must pass the exact pixel grid. One "helpful" auto-scaling device in the chain and your 4K content arrives soft.
  • EDID management. Force the EDID rather than trusting auto-negotiation, especially with extenders over fiber or IP.
  • Refresh rate and genlock. Multi-projector content must be frame-locked. Modulo Pi runs around one frame of latency at 50 Hz, roughly 20 ms, and keeps servers in sync. Whatever your server, verify sync with a moving pattern across a blend zone before calling the chain done.
  • Test with the real content pipeline. Calibrating on a laptop plugged straight into the projector, then switching to the show system afterwards, means calibrating twice. I've done it. Once.

Step 4. Alignment and warping: mechanical before digital

Projector alignment happens in two passes, in this order:

Mechanical alignment first. Rigging adjustments, mount fine-tuning, lens shift. The goal is getting each projector as close as possible to its target zone optically. On a good install, the mechanical pass gets you 90 percent there.

Digital warping second. Corner pins for flat surfaces, mesh warping for curved or irregular geometry. Modern projectors embed their own warp engines (Barco Pulse units, for example, accept externally computed warp and blend maps, documented in the ProjectionTools export reference), and every serious media server has its own. Where you warp matters less than how much: the less you deform, the more contrast and sharpness survive.

On surfaces with real geometry, a façade, a dome, a sculpted object, manual warping stops scaling. A complex multi-projector façade takes me two to three nights to calibrate by hand. That's the honest number, and it's why the autocalibration section below exists.

Step 5. Edge blending: where multi-projector installs live or die

The moment two projectors share a surface, their overlap zone needs a blend: a soft ramp on each projector so the doubled area reads as one image. Get it right and nobody sees the seam. Get it wrong and every viewer's eye locks onto a bright band, forever.

Blending is a full discipline: overlap sizing, ramp curves, gamma in the blend zone, black level compensation (the dirty secret of dark scenes on overlapping projectors). I've written a dedicated edge blending guide that walks through the whole process. If you only read one spoke of this hub, read that one.

One placement rule worth stating here, because it belongs to step 1: blends are decided when you position the projectors, not when you open the blend menu. An overlap that's too thin cannot be fixed in software.

Step 6. Color calibration: match the projectors to each other first

Projector color calibration in a multi-projector install has a priority most home cinema guides get backwards: before chasing an absolute standard, make the projectors match each other. The eye forgives a slightly warm white. It never forgives two whites side by side.

The working order:

  1. Same picture preset everywhere. Identical mode, identical lamp or laser power, all dynamic "enhancement" features off. Dynamic contrast in a blend zone is sabotage.
  2. White point matching. Adjust each unit's white toward the worst projector of the set, not the best. You can only remove light, not add it.
  3. Gamma matching, checked with gray-scale ramps across the blend zones.
  4. Then, if the project justifies it, absolute calibration with a colorimeter toward your target white point.

Mixed fleets make this harder: different models, different lamp ages, different technologies age differently. On permanent installs I plan color checks into the maintenance schedule, because a fleet that matched in January drifts apart by June.

Step 7. Operating conditions: calibrate for the show, not for the empty room

An install calibrated at 2 a.m. in a dark venue can look wrong at 8 p.m. with an audience. Conditions are part of projector calibration:

  • Ambient light. I aim for 200 to 300 lux delivered on the surface for outdoor night mapping, 70 to 100 lux for controlled indoor spaces. Measure the parasite light at show time: street lamps, emergency exits, that one LED wall the scenographer added last week.
  • Thermal drift. Focus and convergence move between a cold and a hot projector. Final checks happen at operating temperature.
  • Maintenance. Dust on a filter costs brightness. A dying lamp shifts color. Permanent installs need a recalibration and cleaning schedule, not a prayer. Content refreshes are a good excuse to re-verify geometry.
  • Documentation. Save calibration files, versioned, off the server. Photograph the physical setup. If your install can't survive your vacation, it isn't finished.

Test patterns: the one tool you'll use at every step

Every step above relies on projecting the right image at the right moment: grids for focus and geometry, ramps for blending and gamma, uniform fields for color and uniformity. Content is useless for this. Content hides problems; patterns expose them.

I keep a full write-up in the test patterns guide, and the patterns themselves are free in my test pattern generator: grids, ramps, convergence and uniformity patterns, exportable at your exact output resolution. Custom resolution matters more than people think. A 1080p pattern scaled onto a 4K output will happily lie to you about focus.

Multi projector setup: what changes at scale

Between 2 projectors and 104, the physics stays identical and everything else changes. What a large multi projector setup adds:

  • Uniformity becomes the top constraint. Viewers compare adjacent projectors before anything else. Brightness matching across the fleet outranks absolute brightness.
  • Networked control stops being optional. Adjusting 104 projectors from their remotes is not a plan. Every unit on the network, monitored, with named presets.
  • Pre-production carries the project. For the Museum of Art and Light, the pixel maps, server layout and projector placement were validated from France before installation. On-site time went to fine calibration instead of discovering problems.
  • Documentation scales with the fleet. At two projectors, memory works. At twenty, only the file naming convention does.

Projector calibration tools and software: what actually helps

The honest tool list for professional work, without the affiliate links:

  • Built-in projector engines. Modern pro projectors (Barco, Christie, Epson, Panasonic) embed warp and blend. Fine for simple geometry, slow at scale.
  • Media server tools. Modulo Kinetic, disguise, Watchout each have their own warp, blend and output management. If a media server runs your show, calibrate in it: one system, one truth.
  • Camera-based calibration systems. The step-change of the last decade. See below.
  • A colorimeter, for color-critical work. Your eyes adapt within minutes; the probe doesn't.
  • A laser distance meter and a real tape measure. Steps 1 and 2 run on these. The least glamorous tools on this list save the most nights.

What I'd skip: any "one-click auto setup" on consumer hardware, and any tool whose calibration you can't export, version and reload.

Autocalibration: when the camera does it better

Camera-based autocalibration projects structured patterns, films them, and computes warp and blend automatically. The underlying computer vision is solid, well-studied territory (a good example of the research: an accurate projector calibration method based on polynomial distortion representation, for readers who want the math).

In practice, on smooth surfaces, flat walls, curves, domes, 2D autocalibration with a single camera takes me under 15 minutes end to end. A dome that would take a full evening of manual mesh-pushing is done before the coffee gets cold. For complex 3D geometry, sculpted façades, volumetric objects, multi-camera 3D systems reconstruct the geometry and calibrate warping on surfaces no manual workflow handles in reasonable time. Modulo Pi ships this built into Kinetic (3D autocalibration, shown at ISE 2025).

The honest limits: autocalibration needs camera positions with clean sightlines, controlled ambient light during capture, and a surface the system can actually see. There are configurations where it works brilliantly and configurations where it fails politely. It also fixes exactly none of your step 1 to 3 mistakes. A badly placed projector, autocalibrated, is a badly placed projector with excellent warping.

The mistakes I keep seeing

After 15 years and 100+ mapping projects, the same calibration errors keep coming back: keystone instead of moving the projector, blends decided after the placement, color matched by eye at 3 a.m., zero saved calibration files. I've collected the full list, with the fixes, in 12 calibration mistakes that ruin video mapping projects. Reading it costs ten minutes. Each mistake on the list has cost someone a night.

When you don't need this method

Being honest about scope saves everyone time:

  • Single projector, flat screen, home cinema or meeting room. Pick a decent picture mode, set focus with a grid, check brightness and contrast with a basic pattern. Done in 20 minutes. The seven-step method above would be procrastination.
  • One-night rental gig on a flat wall, one projector. Steps 1, 2 and 3, a quick grid, ship it. Perfectionism has a call time.
  • Content that never shows dark scenes or fine detail. Bright logo loops on a trade show booth don't justify a colorimeter. Spend the day on rigging safety instead.
  • No budget for the time. A real multi-projector calibration takes nights, plural. If the schedule says "calibration: 2 hours" on a complex façade, the problem isn't technical and no guide fixes it. Renegotiate the schedule or reduce the ambition.

Where the method pays for itself: any blend, any permanent install, any surface with geometry, any client who will look closely.

Stuck on a real install

This hub keeps growing: guides on multi-projector setups, alignment, warping, color and maintenance are in the pipeline, alongside the edge blending and test patterns guides already live. The free tools (throw ratio, multi-projector, test patterns) stay free.

And if your install is fighting you right now and a second opinion would unblock it, write to me. I do this for a living, and reviewing someone's calibration plan takes me a lot less time than their third all-nighter.

Frequently asked questions

Do projectors need to be calibrated?
For professional use, always. Factory settings are tuned for showroom impact, not accuracy, and no two units ship identical. In a multi-projector install, calibration is what makes the projectors read as one image instead of a patchwork. For a single home projector, a 20-minute basic setup is usually enough.
How long does projector calibration take?
It scales with geometry and projector count. A single projector on a smooth surface with a good technical study: one evening. A complex multi-projector façade: two to three nights of manual work. Camera-based 2D autocalibration cuts smooth-surface jobs to under 15 minutes, when the configuration allows it.
When should a projector be recalibrated?
After any physical move of the projector or the surface, after a lamp or light-source change, and on a schedule for permanent installs, because lamps age and colors drift apart across a fleet. Content updates are a good moment to re-verify geometry and blend zones.
What tools do I need for projector calibration?
At minimum: a laser distance meter, test patterns at your exact output resolution, and the warp and blend engine of your projector or media server. For color-critical work, add a colorimeter. For multi-projector installs, camera-based autocalibration saves nights on compatible surfaces.
What is the difference between home cinema calibration and mapping calibration?
Home cinema calibration adjusts one projector toward a color standard on a flat screen. Mapping calibration manages placement, optics, geometry, blending and color across multiple projectors on real surfaces, and matching projectors to each other matters more than matching an absolute standard.
Can software fix a badly placed projector?
Only partially, and always at a cost. Warping resamples pixels, so heavy correction destroys sharpness and contrast. Keystone is the worst offender. If the correction is large, moving the projector is almost always cheaper in image quality than compensating digitally.