Documentation Lumeo
Lumeo technical documentation, the 3D video projection simulator. One section per feature. Use the contents on the left to jump straight to what you need.
Getting started
Requirements
- Browser: Chrome or Edge desktop. Firefox and Safari are not supported.
- Window: 1280 px wide minimum. Below that, a blocking screen appears.
- GPU: required for the 3D engine. A recent laptop is enough, no tablet or mobile.
- Account: optional to try, required for cloud save and sharing.
Create a scene
Three entry points from the ProjectHub or the File menu.
| Action | Where | Result |
|---|---|---|
| New project | ProjectHub | Opens Quick Setup (3-step wizard) |
| New scene | File | Empty scene |
| Example scene | File | Pre-built scene to explore |
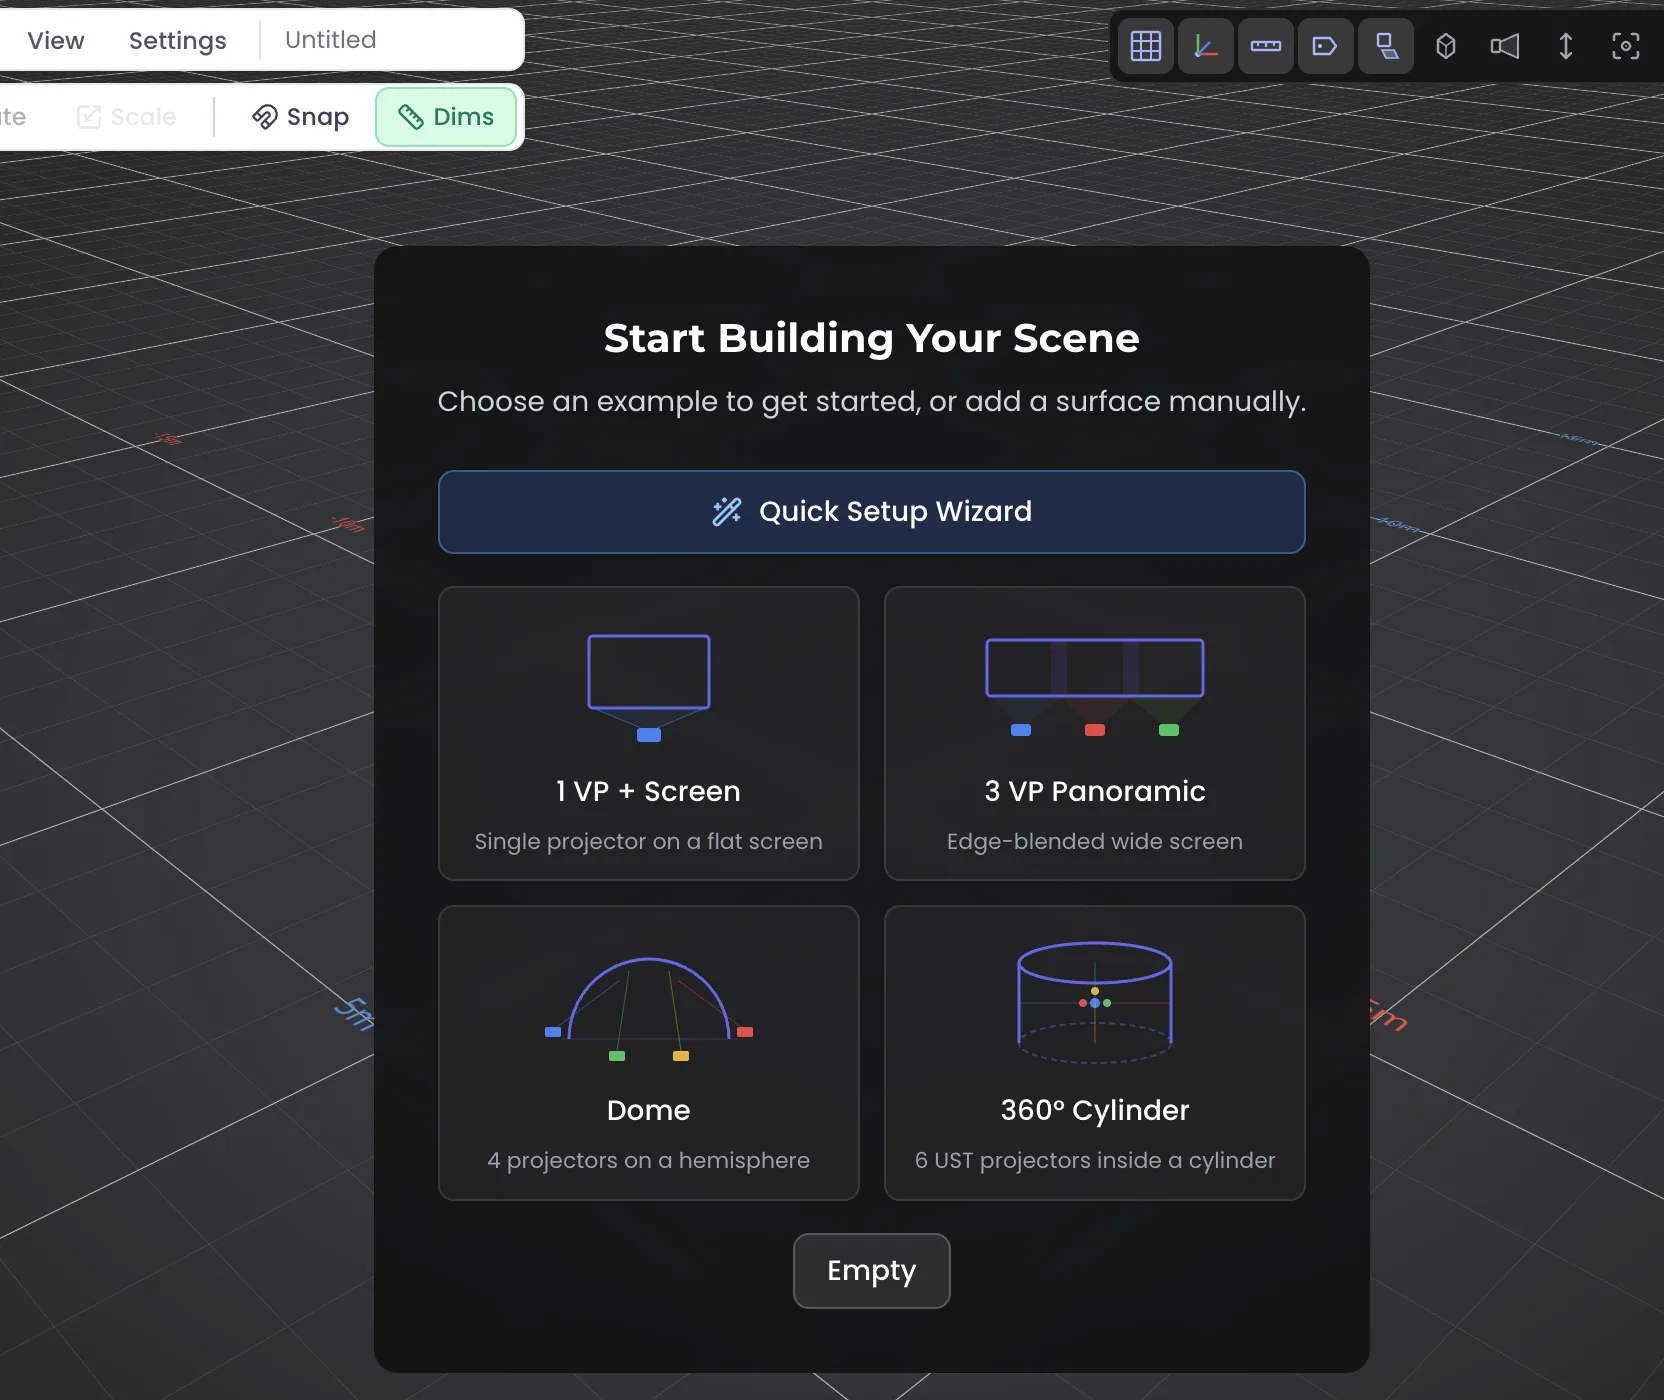
Quick Setup, step by step:
- Surface type (wall, floor, curved screen, etc.) and dimensions.
- Projector model, number of units, projection distance.
- Summary. Confirm: the scene is generated with surface and projectors in place.
Saving and snapshots
- Local save: in the browser (IndexedDB), no account needed.
- Cloud save: automatic when you are logged in.
- Snapshots: frozen states of a project, to roll back. Snapshots window.
- The .lumeo file: full export/import (JSON + base64 GLB).
- Ctrl/Cmd+S saves, Ctrl/Cmd+Shift+S saves as.
Interface
Viewport and navigation
| Gesture | Action |
|---|---|
| Middle click + drag | Orbit around the scene |
| Shift + middle click | Pan |
| Scroll wheel | Zoom |
| Keys 1 to 9 | Preset camera views |
Orthographic views (front, top, side, isometric) are in the ViewportToggles.
MenuBar, SidePanel, HUD
- MenuBar (top): File and Add menus, plus scene settings.
- SidePanel (right): the hierarchical object list at the top, the properties panel of the selected object at the bottom.
- Projection HUD (bottom-left): for the selected projector, image size, lux illuminance (avg/min/max), throw ratio, distance, effective resolution.
ViewportToggles
Top-right corner of the viewport. Each toggle is independent.
| Toggle | Effect |
|---|---|
| Grid | Floor grid |
| Axes | World XYZ axes |
| Dims | Height dimensions on the selected object |
| Names | Projector names in 3D |
| Shadows | Cast shadows between projectors and surfaces |
| Wireframe | Meshes as wireframe |
| Beams | Projection cones |
| AutoFrame | Auto-reframe on the selected object |
Scene objects
Adding an object
Via the Add menu, or Quick Add (Shift+C) which offers the seven main numbered types.
| Key | Type |
|---|---|
| 1 | Projector |
| 2 | Surface |
| 3 | Null object |
| 4 | Human figure |
| 5 | Cloner |
| 6 | Spline |
| 7 | Camera |
Projectors (VP)
Key 1 or the Add menu. Limit: 256 per scene.
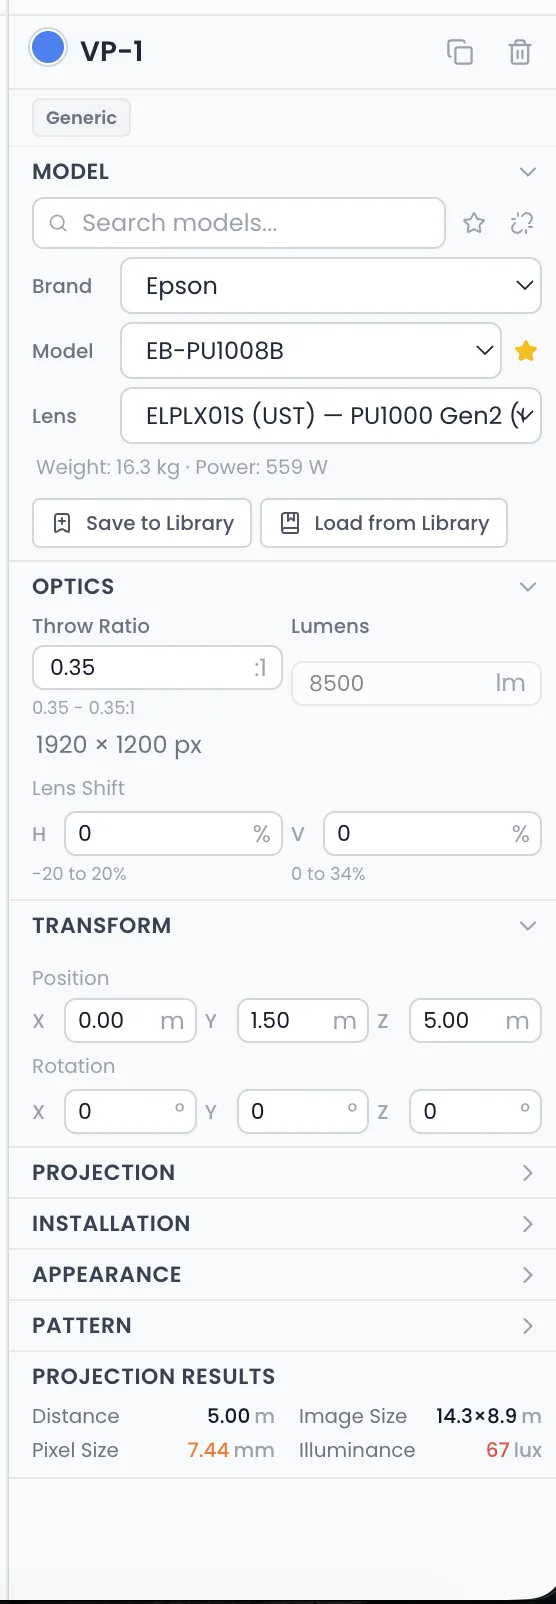
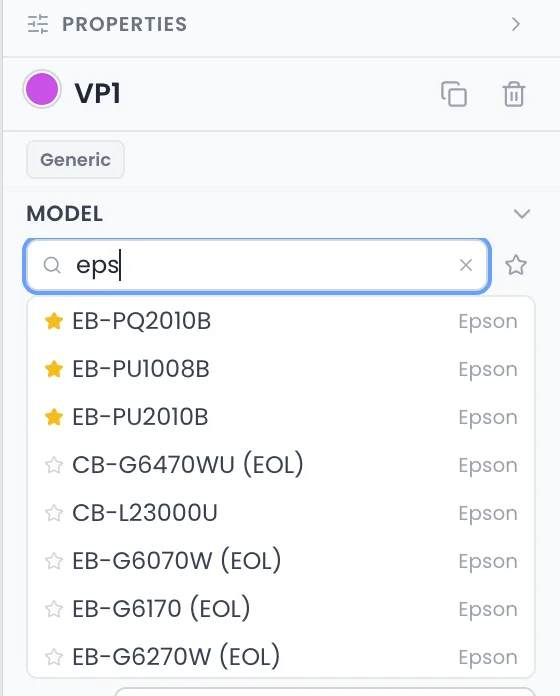
A projector's panel covers:
- Model: chosen via the database selector or the VP Library. Unlink button to switch from a user VP to a generic VP.
- Optics: throw ratio (short/standard presets), zoom min/max, lens type.
- Projection: resolution (presets or custom), horizontal and vertical lens shift, position offset.
- Output: border color, lumens stack (multiplier), lock.
- Pattern: image (Pattern Library or upload) or generated test chart.
- Results: image size, lux illuminance, throw distance.
Surfaces
Key 2 or the Add menu. Limit: 100 per scene.
| Type | Use |
|---|---|
| Plane | Wall, flat screen |
| Floor | Floor projection |
| Cube | Rectangular volume |
| Cylinder | Column, wrapped surface |
| Curved screen | Panoramic setup, parametric arc |
| Sphere / half-sphere | Dome, planetarium |
Each surface has a position, a rotation, an anchor point, and takes a pattern or a texture.
LED walls
Add menu > LED Wall. Limit: 30 walls, 50x50 panels per wall.
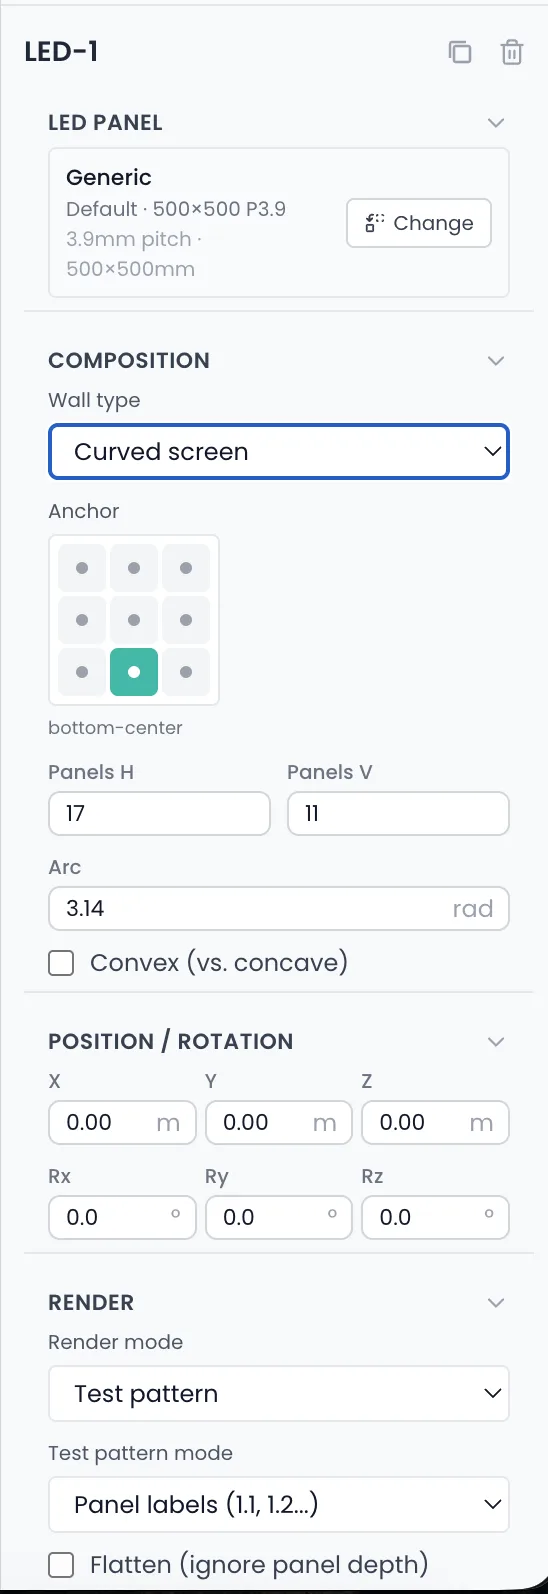
- Composition: type (flat, curved, cube), hCount x vCount grid, cube faces (4 or 6), arc and convexity.
- Panel: chosen from the LED database.
- Render: solid mode, grid, or test chart (classic or per-panel sub-mode), custom color, flatten. In per-panel mode, the pattern facing is configurable: inside, outside or both (useful for a cube seen from within or without).
- Computed totals: panel count, area in m², power in W, pixel count, average brightness.
Trusses
Add menu > Truss. Limit: 50 per scene.
A truss structure chosen from the database. Defined by a start point, an end point and a rotation. Used to represent the real rigging of the equipment.
Cameras
Key 7 or the Add menu. Limit: 5 custom cameras.
- Settings: FOV, position, rotation.
- Share to viewer toggle: the camera becomes a viewpoint the client can access in the public viewer.
- Key C: creates a camera from the current viewpoint.
Imported models (GLB / OBJ)
Add menu > Import Model. Limit: 20 models, 100 MB per file.
- Formats: GLB and OBJ. Cached in the browser (IndexedDB).
- Lumeo respects the file origin, no automatic recentering.
- Import via File > Import > Quick dialog: unit setting, zUp, and live simplification.
- If the orientation is off: custom ±90° rotation per axis.
- Edit parts mode: edits the model's sub-meshes.
- Meshes are used for shadow and collision calculations.
Null objects
Key 3 or the Add menu. Limit: 50 per scene.
A pivot with transform. Child objects inherit its position and rotation. Used to group and move a set of objects as one.
Human figures
Key 4 or the Add menu. Limit: 20 per scene.
A 3D figure at scale, to judge the proportions of a scene. Settings: character (preset rig), arms up or down, position, rotation.
Groups
Add menu > Group. An organization folder in the hierarchy list, with no transform. Unlike a null object, moving a group does not move its children.
Cloner
Key 5 or the Add menu. Limit: 20 cloners, 100 clones per cloner.
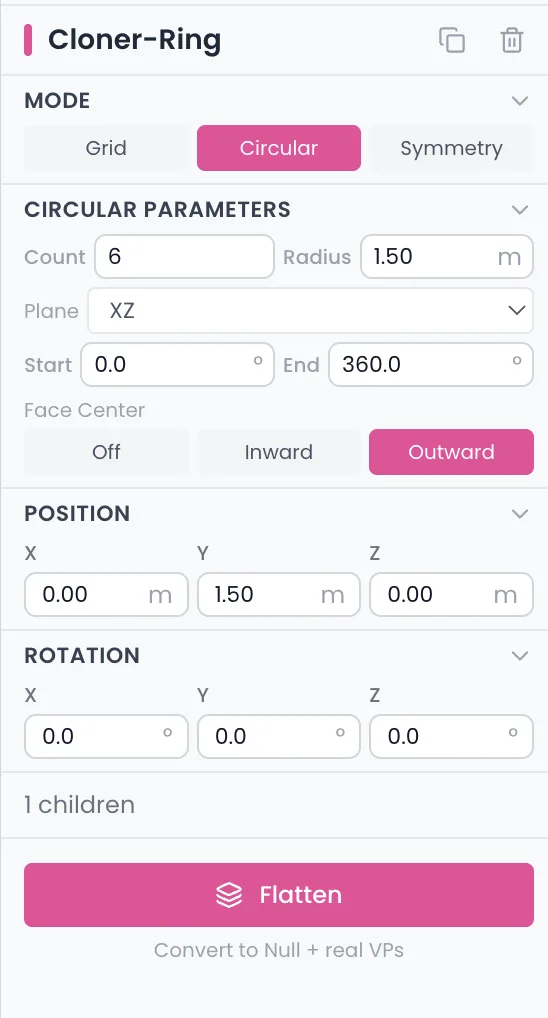
The cloner duplicates a source object. Select the object, add the cloner, choose the mode. Three modes:
| Mode | Parameters | Result |
|---|---|---|
| Grid | countX, countY, countZ | Repetition on three axes (max product 100) |
| Circular | count, radius, axis, centerOffset | Layout in a circle around a center |
| Symmetry | axis, offset, faceCenter (inward/outward) | Reflection of the object across an axis |
- The cloner has its own position and rotation, applied to all clones.
- Clones are virtual renders: ghost opacity, not selectable.
- Flatten button: turns the clones into real, independent objects. Nested cloners are skipped, the source's immediate parent is preserved.
- Clones generate their own shadow maps.
Splines
Key 6 or the Add menu.
A 3D curve editable point by point. Circle or custom type. Used as a visual guide or a path to position other objects.
Databases
Projector database
293 projectors and around 763 lenses, with real manufacturer specs (Sony, Panasonic, Christie, Barco and a dozen other brands).
- Filters: manufacturer, series, model, throw ratio, brightness, zoom, text search.
- User VP: saved in the VP Library, brand and model read-only, inherited from the database.
- Generic VP: standalone, all values freely editable.
VP Library
- Stores your projector presets to reuse across projects.
- Shows how many times each preset is used.
- Swap: replaces a model everywhere in the scene at once.
- Deleting a preset converts all linked VPs to generic VPs.
LED panel database
Twelve main brands. Specs: panel dimensions, resolution, pitch, brightness (nits), weight, max and average power.
- Filters: manufacturer, series, model, pitch range (fine, medium, coarse, large), indoor/outdoor, include discontinued models, sort by pitch/brightness/brand.
- If the database is unreachable: a fallback generic panel (500x500 mm, pitch 3.9).
Calculation and render
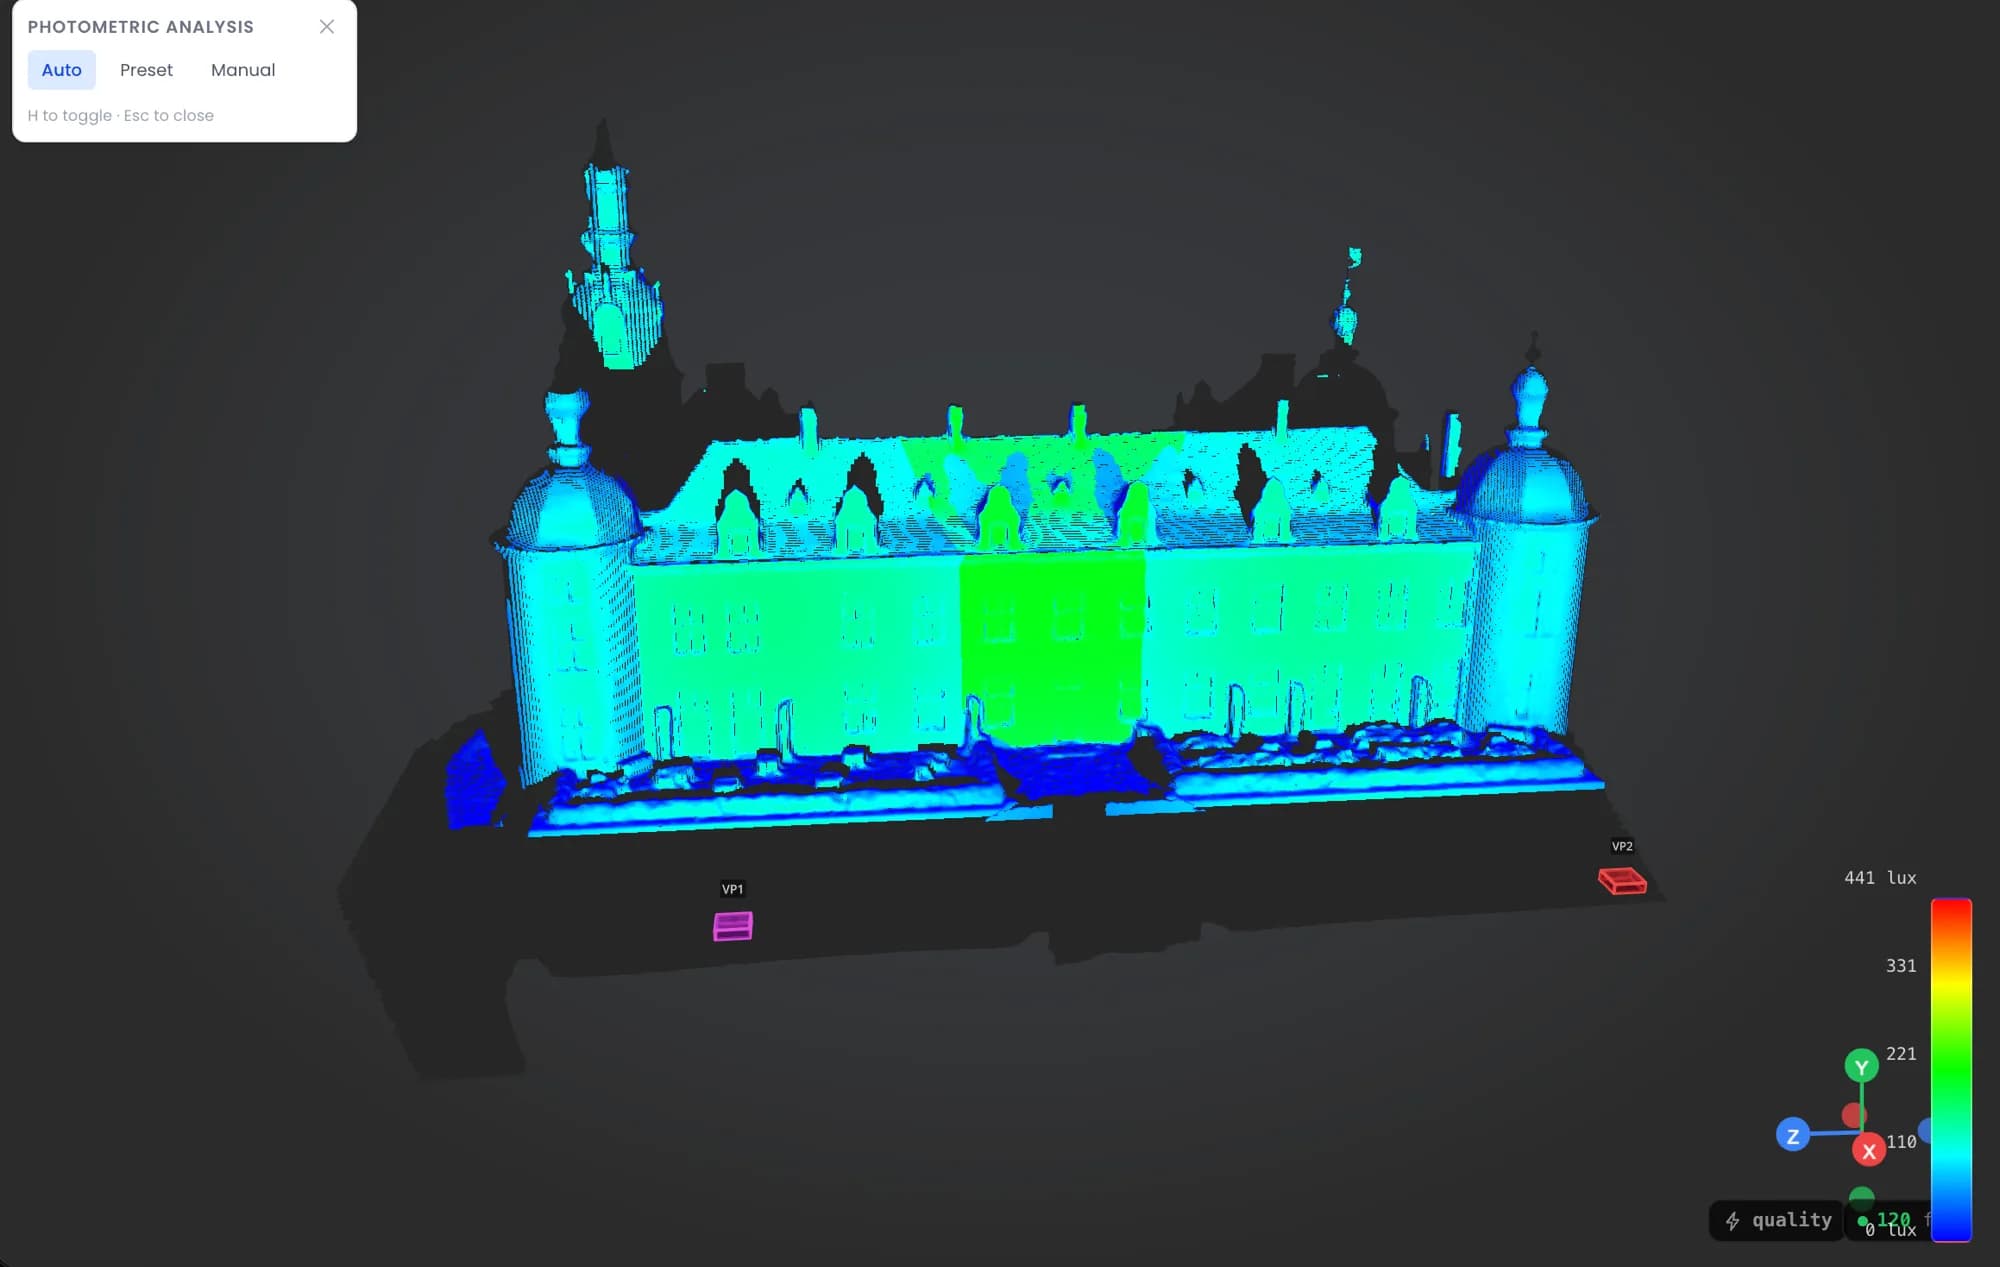
Photometric calculation
Key H: enables analysis mode. A lux heatmap on each surface, updated every frame.
The projection HUD shows, for the selected projector:
- Projected image size (width x height in m)
- Illuminance: average, minimum, maximum, in lux
- Throw ratio and throw distance
- Effective resolution on the surface
Shadow maps
Shadows toggle. Computes cast shadows between projectors and surfaces. Used to spot blind angles at design time. 256 simultaneous shadow maps maximum.
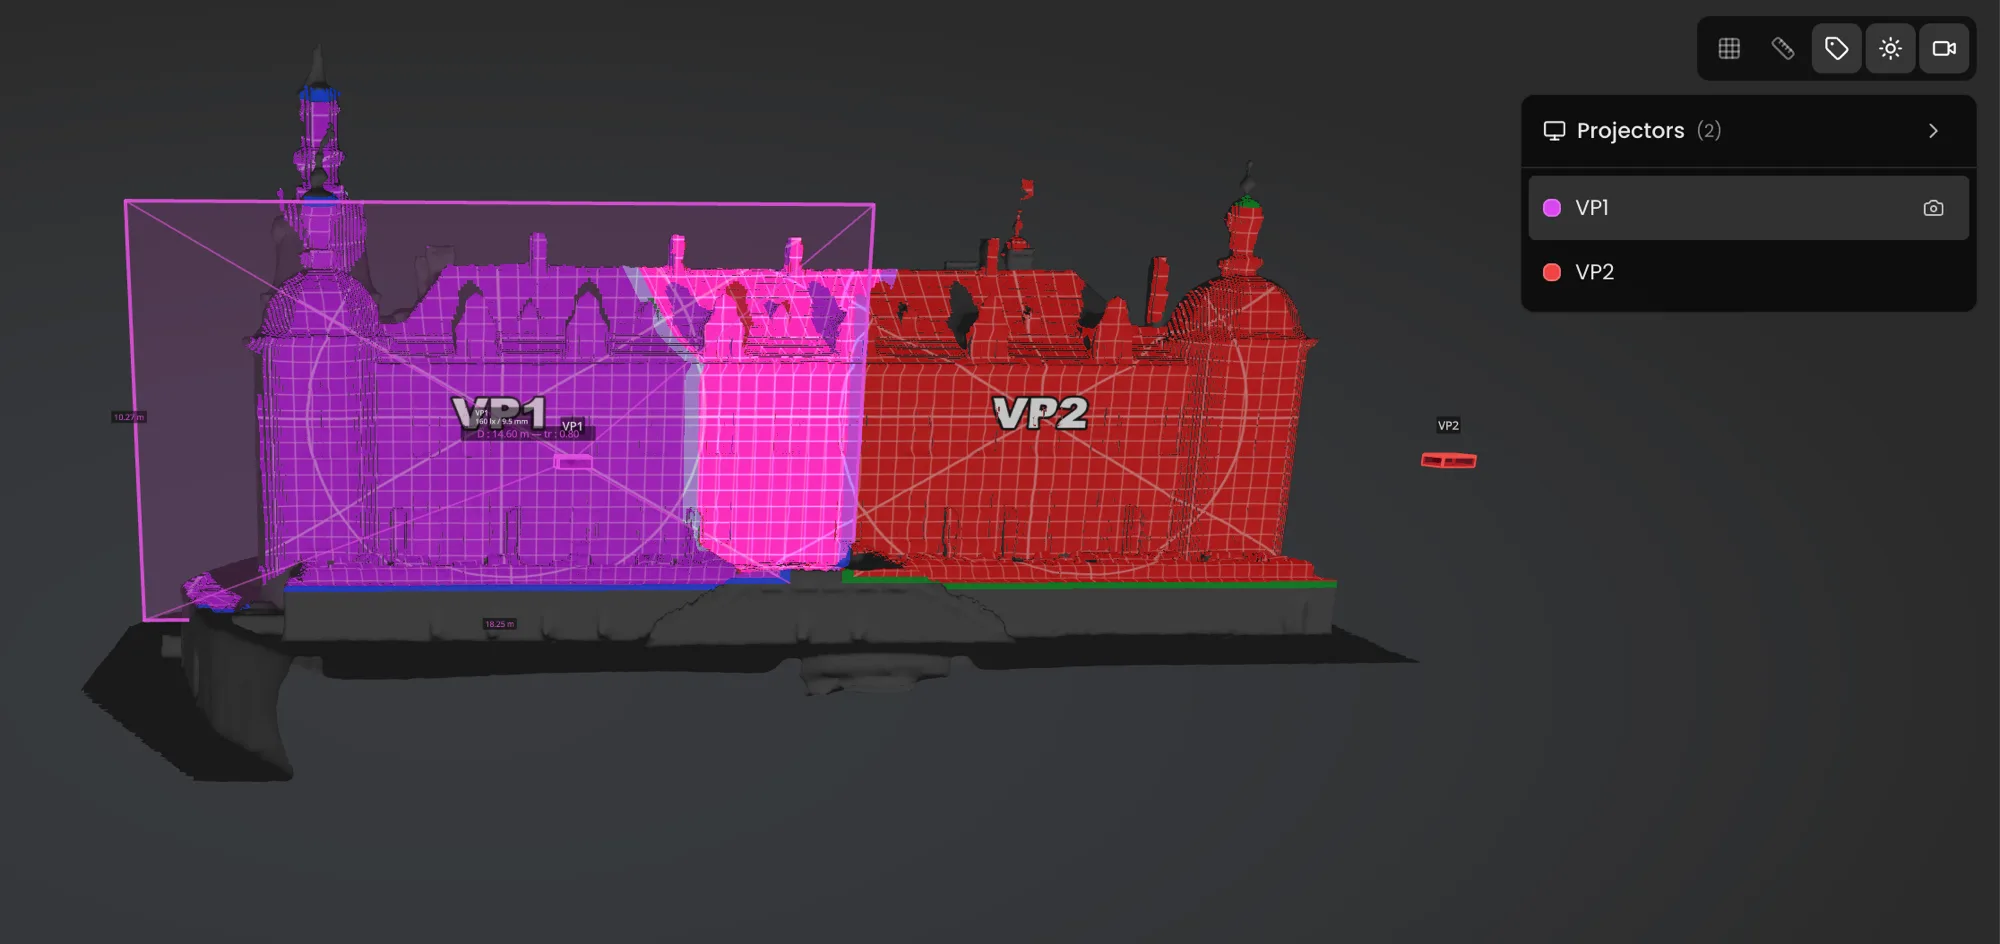
Beams and wireframe
- Beams: shows each projector's projection cone. Shows what each unit actually covers.
- Wireframe: shows meshes as wireframe, useful to check an imported geometry.
Patterns
Pattern and test chart editor
Each surface shows a pattern. Two modes in the editor:
- Generated chart: color grid, circle, cross, custom text (size, offset), background color.
- Image: direct upload or selection from the Pattern Library.
- Auto-regeneration on every surface dimension change. A banner warns if the pattern needs to be regenerated.
Pattern Library
- Stores your test chart images in the cloud, with tags.
- Two tabs: your personal patterns, the curated Lumeo library.
- Actions: upload, tag, rename, delete, apply.
Measurements and annotations
Measurements
Key M: enables measure mode. A type selector appears. Limit: 50 measurements per scene.
| Type | Input | Result |
|---|---|---|
| Linear | 2 clicks | Distance in m |
| Radial | 3 clicks | Circumscribed circle radius |
| Angular | 3 clicks (vertex + 2 arms) | Angle in degrees |
| Chain | N clicks + Enter | Total + per-segment detail |
Measurements snap to vertices, edge midpoints and face centers. An amber indicator appears on hover. A snapped measurement is parametric: it follows the object if it moves.
3D annotations
Key A: enables annotation mode. Limit: 200 per scene.
Click a point in the scene, type a text. A 3D note anchors at that spot. Settings: text, color, size, optional image. Used to document a scene for a colleague or a client.
Exports
PDF export
File menu > Export PDF. Three tabs:
| Content | |
|---|---|
| Scene PDF | 2D layout plan, footprint of each projector, statistics |
| Tech Sheet PDF | Technical sheet: specs, photometric calculation, LED wall summary |
| Measures PDF | All measurements with their values (linear, radial, angular, chain) |
3D export
File menu > Export 3D Scene. GLB or OBJ formats. Exports the full geometry: surfaces, projectors, LED panels, trusses, imported models, with materials.
LED BOM export
File menu > Export LED BOM. An Excel file in three sheets: Walls (one row per wall), Panels (unfolded layout), Summary (aggregated by model, with a scene total row).
CSV export and screenshot
- File menu > Export CSV: projector list (brand, model, position, throw ratio, lumens).
- Key E: viewport screenshot as PNG.
Sharing
Read-only client viewer
Each project is shared via a public read-only link. The client opens the link, with no account, and views the scene in 3D without being able to edit it.
- Camera bar (bottom): Free button to orbit, one button per shared camera to switch to POV.
- Viewer toggles (top-right): Grid, Dims, Names, Shadows, Cameras.
- If the scene contains an LED wall: an LED glow slider.
- The link stays up to date with the latest version of the project.
Reference
Keyboard shortcuts
| Key | Action |
|---|---|
| Ctrl/Cmd + S | Save |
| Ctrl/Cmd + Shift + S | Save as |
| Ctrl/Cmd + Z | Undo |
| Ctrl/Cmd + Shift + Z | Redo |
| Ctrl/Cmd + D | Duplicate |
| Ctrl/Cmd + C / V | Copy / paste |
| Delete | Delete the selection |
| H | Photometric calculation |
| M | Measure mode (linear, radial, angular, chain) |
| A | Annotation mode |
| C | Create a camera from the current viewpoint |
| N | Projector names in 3D |
| E | Screenshot |
| Shift + C | Quick Add |
| Shift + S | Snap mode (off, all, vertex, edge, polygon) |
| Shift + P | Dual POV mode (projector comparison) |
| Up/down arrows | Previous / next projector |
| Left/right arrows | Pan the selected projector (0.1°, or 1° with Shift) |
| 1 to 9 | Preset camera views |
| Enter | Confirm (modal transform, end of measure chain) |
| Esc | Cancel / exit the current mode |
Per-scene limits
| Item | Limit |
|---|---|
| Projectors | 256 |
| Surfaces | 100 |
| LED walls | 30 (50x50 panels per wall) |
| Trusses | 50 |
| Null objects | 50 |
| Human figures | 20 |
| Cloners | 20 (100 clones per cloner) |
| Custom cameras | 5 |
| Imported models | 20 (100 MB per file) |
| Measurements | 50 |
| Annotations | 200 |
| Undo history | 50 steps |
Projects save automatically to the cloud when you are logged in. Snapshots let you roll back to an earlier state of the project.
Cookies and privacy Learn more
Cookies and privacy
This site uses cookies to measure audience and improve your experience. You can accept, reject or customize your preferences at any time. Learn more